All posts by Kent Del Castillo

About Kent Del Castillo

I have been a web developer since 1993. I started with simple HTML pages and progressed into more complex tools and languages as the web evolved. Besides the web, I play drums, enjoy movies, and golf when I can.

Nintex Workflow Migration Considerations

*This post was originally posted here.

Many companies are making the move from on-premises SharePoint to the cloud. There are many advantages of making the move – resource requirements are lessened, cost, features, accessibility, and more. It’s great once you are there, but the biggest challenge can be the work getting there. Migration to the cloud requires careful planning, knowledge and experience to take advantage of the cloud for the different types of content. Nintex Workflows are one of the best additions to Office 365 and migrating your existing on-premises workflows successfully isn’t a problem with the following considerations.

Missing Actions

Unfortunately, the cloud version of Nintex Workflows is not a 1-to-1 implementation of on-premises Nintex Workflow 2010 or 2013. The reason for this is because of Microsoft’s Workflow Manager model in Office 365 which does not support all of the actions from on-premises. At the time of this writing, there are 40 out-of-the-box Nintex actions unavailable in Nintex for Office 365. Custom workflow actions are also not supported. While most of the Nintex out-of-the-box actions have been replicated, they do not necessarily work the same as it does on-premises. This is due to the architectural differences between the two environments.

Nintex Workflow 2016 has the unique option of creating workflows that are fully compatible with Nintex Workflow for Office 365. As you begin to create a new workflow in SharePoint 2016, you can choose between creating an on-premises version with the extra 40 actions available or create an Office 365 compatible version that does not. While there are less actions available with the compatible option, it does ensure that your workflow will be compatible with Office 365 when you migrate.

SharePoint Online Limitations

There are also some key differences with SharePoint Online versus on-premises. One limitation is that a workflow file cannot not exceed 5MB in size after it is exported. When checking for a file size, know that a Nintex workflow is compressed when exported. To obtain the actual size, you will need to expand the NWP file to see what the total size is. Workflows exceeding this limit may have issues online. To reduce the risk of error, any large workflow may have to be rearchitected before moving to the cloud.

There are many other differences with the cloud that should be known. For example, one of the issues most clients run into is the immovable 5000 item List View Threshold limit. This is the maximum number of items that can exist in a list view and keep good performance. In SharePoint on-premises, an administrator can raise the limit or set Daily Time Windows where the limits are raised. In Office 365, this limit cannot be changed and is in place 24×7. It may be necessary to create new lists to address this issue which may affect workflows. This is one example where knowledge of the limitations within SharePoint Online is paramount to a successful migration.

Other Considerations

Because of the differences in Office 365, issues can arise with workflows when implementing features. Turning on something like two-factor authentication may cause significant issues with Nintex workflows.  Knowing the limitations of Nintex’s different implementations in relation to Office 365 features prevents downtime by using workarounds.

The architecture of your workflows should be reviewed. Some actions affect performance more than others (e.g. Execute SQL, Query LDAP, etc.). Excessive looping can significantly slow down, stall, or have their execution throttled. Unfortunately, you cannot modify or increase the hardware running the workflows like you could on-premises. Also, the SharePoint Online Workflow Engine controls workflow throttling which Nintex has no control over. The only option is to increase efficiency through design with the workflow.

How Do I Get There?

All of these considerations can seem very daunting when approaching a migration to the cloud for the first time. This stress is increased since the cloud is always changing. Finding experts that are focused on this activity with experience of various requirements with solutions can help mitigate the unknowns.

A third-party migration tool like Sharegate can greatly assist with the move. Sharegate works directly with Nintex to improve their ability to produce successful migrations. Sharegate will move all Nintex workflows, including those with actions that are not supported. Placeholders are put where the actions would normally be. The placeholders are labeled with the comments of the original action for easy identification.  This allows for a workaround to be developed within Office 365 which also helps with testing in the target environment.

Conclusion

Migrations are a complex process. The recipe for success is investigation of the existing environment, planning, knowledge of the current target environment, and a good 3rd-party tool. Experience with the cloud and tools involved is also desired. With that combination, getting your Nintex workflows to the cloud will be a success for you and your organization.

Capturing Comments for Nintex’s Lazy Approval in Office 365

*This post was originally posted here

Providing solutions for customers is always a win when you can improve communication between employees. With Nintex workflows, one of the challenges many developers have with Lazy Approval on Office 365 is capturing the comments provided by Approvers in the email back to the original submitter. A task email is sent to an Approver and that Approver can only reply with the approval/rejection keywords. Any other comments in the email will be disregarded by the system. Also, there is no option to CC the original submitter in the initial task email which means the only way for an Approver to email comments back to the original submitter is by manually copying them in the approval/rejection email. This would not allow the comments to be captured along with the task. Frustration with this issue can be seen on the Nintex UserVoice site where it is one of the top voted requests. While comments cannot easily be captured if the Approver replies by email, they can be captured if the Approver customizes the Nintex task form. Simply put, the comments are captured in a workflow variable and added to the body of the email.

To accomplish this, start by creating your form and workflow. For this example, I am using the simple workflow below:

The first step is to create the text variable that will capture the comments from the custom Nintex task form. Click “Variables” from the workflow ribbon and then click “New” to create the text variable. I’m calling mine “TaskComments”.

After that has been completed, go into your “Assign a task” action and click on the “Edit Task Form” button in the ribbon.

You will be presented with the standard Nintex form that you can customize. Next, create a panel at the bottom of the form and assign a rule to hide the panel at all times. The rule should have these settings:

Add a “Calculated Value” field to the panel. This field will assign the comment to the “TaskComments” variable we created earlier. Add the Named Control called “Comment” to the Formula and set the Connected to field to the variable “TaskComments”. The settings should look like this:

Save everything. Your form should now look something like this:

Now all that is left is to add the variable to our email. Go into your “Send an Email” action on the “Rejected” branch and add the “TaskComments” variable to the body of the email. It should look something like this:

Do the same with the Approved email and you’re done. Publish the workflow and you’re good to go!

clip_image_08.jpg

Track and Visualize Compliance Events as Part of Nintex Workflows

This post was written for B&R Solutions

Like most consulting groups that build a lot of workflows for process automation, we work with a lot of approval processes to help formalize important reviews and decisions while supporting compliance activities.  We recently received an interesting request to update an existing process we helped build and maintain.  In this particular approval process, the financial transactions were being reviewed and approved, but the stakeholders really needed to be able to view the pending and approved transactions.

Adding a calendar to visualize when approvals have taken place was a big win with the client. The requirements for setting it up were simple. The events would have either a ‘Pending’ or ‘Approved’ state and can approve via email. Finally, the events would appear on a calendar color-coded to each state of approval.  Because the pending documents are stored in a separate library from final documents, and to support color coding and full featured calendar connections, we chose to use a calendar list versus the limited calendar view format for a traditional SharePoint library.

Nintex’s LazyApproval is a great solution for approval workflows. Setting up the workflow was simple. Once a user adds a new document and sets the event date, the workflow creates a calendar event and then creates a task. The first step in the workflow is a filter to check if the Created date is equal to the Modified date. This lets me know if the item was just added to the library without having any metadata added to it. I could check to see if a calendar item has already been created. This would occur if an item had already been rejected and updates have been applied to the original item. If not, the calendar item is created in the ‘Pending’ state. On approval, the calendar item is set to ‘Approved’. If rejected, it will stay as ‘Pending’.

The workflow looks like this:

The way I keep the Calendar Events in sync with the documents is by using the Document ID. I added a text field called “Document ID” and write the Document ID value on creation of the calendar item. That makes it easy to query.

Setting up the calendar requires a trick in the use of the ribbon option ‘Calendar Overlay’.

Normally, separate SharePoint calendars are used to overlay onto a single calendar. Using that method, 3 separate calendars would be required for this solution, one for each state of the event. The trick is to add a separate calendar view as a separate calendar. By using this method, there is no need for separate calendars, only for separate calendar views.

Once you enter your site into the Web URL and click ‘Resolve’, the List and List View dropdowns should populate. Simply choose them and when your calendar items meet the criteria for the list view, they will appear with the color you chose.

The result is a single calendar with multiple color-coded entries. Events can even span multiple days or specific times depending on your start/end dates and times.

While this is just a subset of the total workflow, it illustrates a great technique that can be used for supporting your compliance activities. Creative uses of workflows with SharePoint apps help demonstrate the full power of the platform as well as their investment to the client generating a win on many levels.  Utilizing what is available in the box combined with thinking out of the box is key to happy clients.

What’s New for IT Professionals in SharePoint 2016 by Bill Baer

Notes:

  • Prerequisites:
    • Will support Windows Server 2012 R2 or Windows Server 10
    • Windows Management Framework 3.0
    • App Server Role, Web Server (IIS) Role
    • .NET Framework 4 (KB2898850) – 4.5.2 or if on Win10 4.5.6
    • SQL Server 2012 Native Client
    • Microsoft Identity Extensions
    • Microsoft Sync Framework Runtime v1.0 SP1 (x64)
    • Windows Server AppFabric 1.1 – will continue to support it
    • Windows Identity Foundation v1.1
    • Microsoft Information Protection and Control Client
    • Microsoft WCF Data Services
  • Standalone installations will no longer be supported; No more SQL Server Express
  • Upgrade from 2013 but not 2010
  • Same shared services will be available (those services that are not available in Online were backported)
  • Any backward compatible site collections will have to get brought to 2013 mode and then upgrading to 2016
  • Database attach to upgrade or Data Migrate
  • SAML auth becomes the default and first class citizen because it is cloud-ready; Windows Identity still supported; moving away from domain-based authentication
  • Supports STARTTLS encryption to improve messaging security so you can run on non-default ports
  • 3 Roles
    • User – “any request initiated by an end user is processed by that machine that is defined as a user role or a web server”; Any end user request should be managed end-to-end by a single machine
    • Robot Request – not user initiated – provisioning, timer jobs, search
    • Caching Services
  • New minRole topology
  • New grey wizard “Specify Server Role” screen
    • Special Load – custom definition; Reserved for services that needed to be isolated from other services; recommended for 3rd party services
    • Web Front End – Services end user requests. Servers assigned to this role are optimized for low latency
    • Search
    • Application (robots services role) – Services backend jobs or requests triggered by backend jobs. Servers assigned to this role are optimized for high throughput
    • Distributed Cache – Servers assigned to this role can load balance end user requests among the web front ends
    • Single Server Farm – no more SQL Server Express
  • Can still use psconfig or powershell -islocalserverrole
  • Health Analyzer Rules scans every role except Special Load; will define if server is “In Compliance” with role definitions
  • CA look-and-feel is mostly the same
  • Patches getting consolidated and will be smaller, execute faster and with zero downtime.
  • Patches will run online, not offline.
  • New Boundaries and Limits
    • Db – into the TB’s
    • Site Collections per Content Db – 100k site collections per content Db
    • List – Greater than 5000
    • MaxFile Size – increased to 10GB
    • Indexed items – 2x increase to 500 Million items
  • Moving away from file sync via soap over http by utilizing bits
  • Fast Site Creation – uses spsite copy command at the Db level bypassing feature activation
  • Traffic Management – Platform Resiliency – new endpoint running on web servers, establishes affinity between web and load balancers, intelligent routing based on variables
  • User Profile service no longer baked in – removed built-in FIMS, supports external now.
  • Project Server Db consolidated into Content Db
  • Durable Links – Url remains instact with rename or move using Resource Id’s. Enables discrete Url on visibility. Move file between site collections and link will still work. Renaming file does not change link since it’s based on resource id.
  • Advanced data analysis and reporting, real user monitoring.
    • SLAPPY
  • ODF support in document libraries
  • Classification ID’s for eDiscovery. Supports hybrid connectivity.
  • eDiscovery works across both on-prem and cloud
  • Cloud Search Service Application – unifies both indexes and search across retrieving a blended resultset instead of separate result blocks so Delve and OfficeGraph can be accessible from online but include on-prem results
  • Extranet Site publishing – publish internal sites to Internet, leverages O365 identity federation services
  • Hybrid Team sites
  • Follow doc online and it gets represented on prem
  • Hybrid configuration wizard type of functionality via a new resource center instead of Powershell mountain
  • Still a year left of development. Public preview at end of year. Hybrid search from o365 available later this year.

Site Content and Structure error

Whenever I tried to access my ‘Content and structure’ link in Site Settings under Site Administration, I would get an error and it would fail. After checking the logs, the following helped me to fix this issue:

First, I used the SharePoint Feature Administration and Cleanup Tool from CodePlex and cleaned out any errors. This changed the error in the logs.

There was now a list ID that was giving a problem. To find which list it was, I searched via the list ID in PowerShell:

Get-SPSite http://yourSite | Get-SPWeb  -Limit ALL | %{$_.Lists} | ?{$_.ID –eq “your-list-ID-no-brackets”} | ft Title, ParentWebURL, RootFolder

Then I deleted the list by name:

$web = get-spweb -Identity http://yourSite
$list = $web.lists["Name of Offending Library"]
$list.AllowDeletion = $true
$list.Update()
$list.Delete()

This script lists all of the titles and IDs per site:

$sitec = Read-Host 'Enter Site Collection (ex: http://yours.yourdomain.com)'
$subsite = Read-Host 'Enter Sub-Site(ex: departments or ENTER for "root")'
$site = Get-SPSite $sitec
$web = $site.OpenWeb("$subsite")
write-host "Site: " + $site.id
write-host "Web: " + $web.id
$web.lists | Format-Table title,id -AutoSize
$web.Dispose()
$site.Dispose()

After doing this, I was able to open the link without error.

Gmail scripts – Mark Read During Business Hours

I quickly threw this together. The following script would mark all Gmail email coming in to be read if it’s Monday through Friday between the hours of 9am and 5pm. This is done at http://script.google.com with the API from https://developers.google.com/apps-script/reference/gmail/.

Don’t forget to click on Resources > Current Project’s Triggers and have it run once a minute!

function markReadDuringBusHours() {
    var currentDate = new Date();
    var currentDay = currentDate.getDay();
    var currentHour = currentDate.getHours();
    var threads = GmailApp.getInboxThreads();
    if (currentHour > 8 && currentHour < 18 && currentDay > 0 && currentDay < 6)
    {
        GmailApp.markThreadsRead(threads);
    }
}

“Getting the most out of SharePoint” email

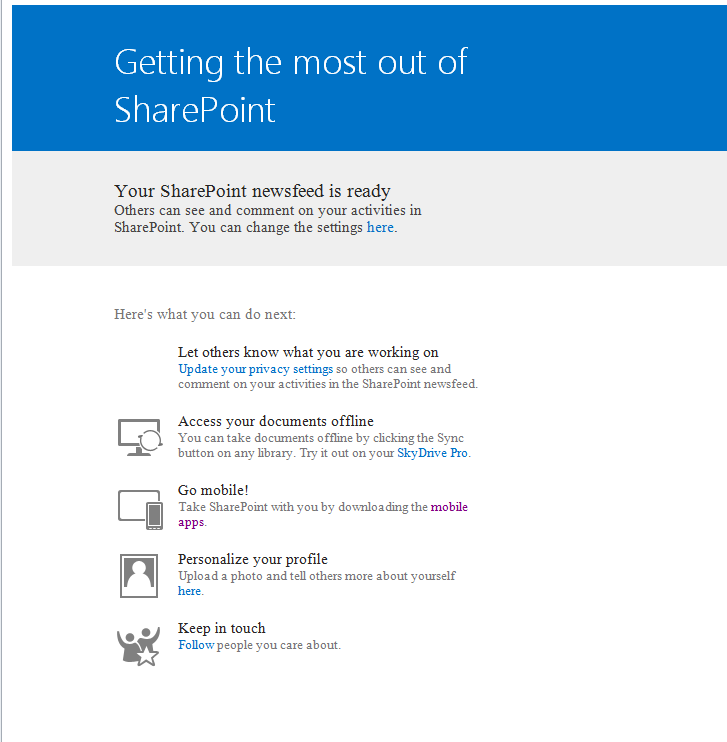
Once a user completes the creation of their My Site, an email will be automatically sent that looks like this:

Get the Most Out of SharePoint

As you can see, you may not want this to be sent out or, at least, have the ability to customize it. Unfortunately, it’s baked into SharePoint so your only options are either to intercept the email via Exchange or to customize files that could be replaced on a service update, patches, whatever.

To customize, read this. Is this how I get the most out of SharePoint?

The file in question is located in: C:\Program Files\Common Files\microsoft shared\Web Server Extensions\15\Resources

And to get rid of the Let’s Get Social dialog box, click here.

Add ‘Sign in as Different User’ back to SharePoint 2013 Drop Down

1.  Navigate to the C:\Program Files\Common Files\Microsoft Shared\Web Server Extensions\15\TEMPLATE\CONTROLTEMPLATES\Welcome.ascx file and open it in a text editor

2.  Add the following snippet before this line <SharePoint:MenuItemTemplate runat=”server” id=”ID_RequestAccess”


<SharePoint:MenuItemTemplate runat="server" ID="ID_LoginAsDifferentUser"
Text="<%$Resources:wss,personalactions_loginasdifferentuser%>"
Description="<%$Resources:wss,personalactions_loginasdifferentuserdescription%>"
MenuGroupId="100"
Sequence="100"
UseShortId="true"
/>

3.  Save and reload in browser. You’ll get the “Working on it…” screen before the site loads.